The genesis of choosing this block for BOM was a picture of a quilt from one of Barbra Brackman's blogs.

http://civilwarquilts.blogspot.com/2015/03/symbolism-in-abolition-quilt.html
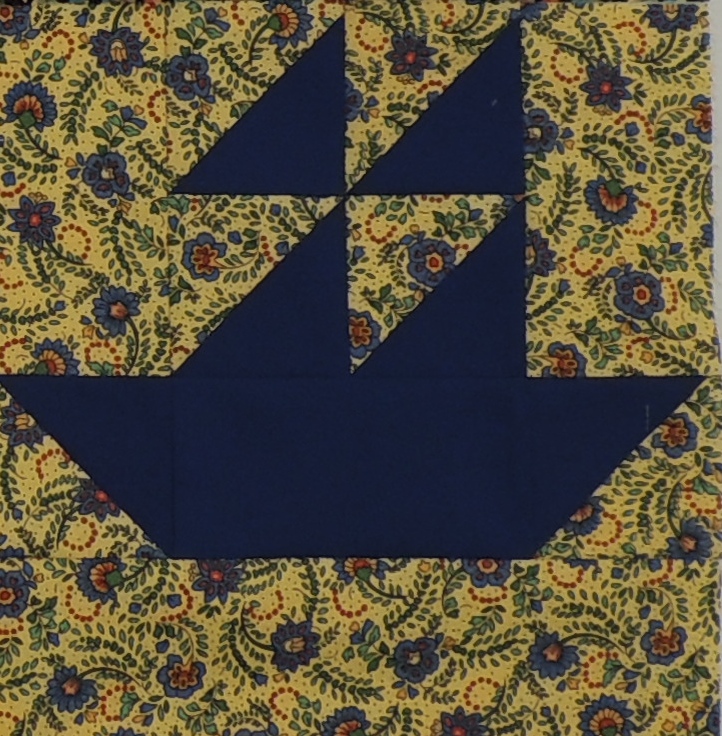
I liked the quilt right off and the thing that made me think it might make a good BOM is that it really did not seem to make a difference what the background was (as long as the sails and background had good contrast) because the bright solid sail boats are really what catches and holds your attention. I figured maybe I could supply a batch of solids for continuity and the fun could be in choosing the prints!
I started by making some sample blocks.

Well, yes, I got a little carried away but they were so much fun to make I just kept experimenting with background prints and they all seemed to play well together!
So here's how I put these blocks together to get accurate 10.5" blocks unfinished.
Cutting instructions:
From the solid: cut 1- 3.5" x 10.5" strip
1- 3" x 5.5" strip
From the print: cut 1- 3.5 x 10.5 " strip,
2- 3" x 5.5" strips
1- 3" x 10.5" strip
Sewing Half Square Triangles =HST
There are lots of ways to sew HSTs. When I am sewing small numbers of them this is my go-to technique. I like to cut the squares a smidge big and then cut them down after they have been sewn for better accuracy:
Start with the 3.5" x 10.5" strips of both the solid and the print. Put them right sides together and press them. The pressing creates 'Static Cling' between the 2 layers which makes for very accurate cutting!

Cut the strip into 3- 3.5" squares.

Cut these in half being careful not to disturb the 'Static Cling'.

I usually stack them up like this to take to the sewing machine

See my last post if you need more info. on getting an
accurate 1/4" inch seam.

When you get to the end of the seam it's important to put your pointer finger right next to the presser foot so that the last bit of the seam does not 'fishtail' out from under the presser foot.
Holding the very end of the triangle may also keep it from sliding. You might need to experiment a bit to see which method works best for you. Some people use what's called a stiletto ( a metal pointy thing) but I find that a bit cumbersome.

Here are the 6 HSTs all ready to be ironed, toward the solid.

These units need to be trimmed to a perfect 3" square!

Assembling the Block.

I think sometimes people think that all it takes is an accurate 1/4" seam and their blocks should come out right, right?
There's a lot more to it than that!
Congruency: If two things are the same size they should fit over one another exactly.
Can you tell if there are two patches stacked or only one? There are 2 but it's really hard to tell because they are congruent.

Below are the same two patches only I've messed slightly with the way they are stacked.
If sewn in this position they will not make a perfect 3" x 5.5" unit. It's only a hair off but those little errors add up if you don't make your patches really congruent every time you sew them together.

Oh, Ironing! You don't want to scrub across your patches as if they were laundry it can pull your patches out of square!

Iron toward the top sail here
And iron toward the bow and stern on the boat.


Next up: sew side rectangles to each sail pair.
Be careful which side you sew your patches to the sails, one is on the right the other on the left.
Also sew bottom rectangle to the bottom of the boat and iron toward the boat.

You may ask why sew in this order rather than sails together first and side patches second.
I think it's a little easier to match up the middles this way?!

In order to match up the sails in the middle of the seam I stick a pin straight through the seam making sure it goes through right at the seam line on both sides then rotate the pin to secure it in place.
You can see the seams are going the same way, it's a little bulky but it keeps the pressing of the sails going the right way.

Iron toward the bump in the seams if you do this slowly the presser foot should ride up over the bump and give you a good match


Pin the top of the block to the bottom. The seams should nest with each other.

Press toward the bottom of the block.

10.5" on the button!

I hope you have fun making this block!
Your feedback on these instructions would be most appreciated!
Cheers, Claire W.


Your block looks great in mixed prints! Generally we see this quilt in a two or three color layout. This is much better!
ReplyDeleteMy first quilt over 33 years ago was a ships quilt for my newborn nephew. Time to make another! Your use of solids with varied backgrounds is wonderful.
ReplyDeleteThank you Claire! I love those sail boats! You wrote out very clear directions and added some really good tips. Ironing the strip together, a very good idea.
ReplyDeleteHere's a comment from my friend Anne who sent me this email: cw
ReplyDeleteHi Claire,
I just wanted to let you know that I made your BOM squares off your blog and they're great - I made a number of them. I tried to post (twice) comments to the blog and somehow it didn't work. I just wanted to say that the directions are super! Probably the best I have used. I tend to be a big mistake maker and "do over" quilter and I made much fewer mistakes. Each time I made a mistake, I thought "aha! I found a problem with the directions!" and each time I re-read the directions and they were spot-on, I just hadn't followed them! Your tips are great.
I'm looking forward to next month's! Anne
Appreciate the tutorial, especially love when the way to press is included. Looking forward to seeing what's next.
ReplyDeleteGreat post, and so useful! Thanks, Claire. I didn't have this because I wasn't doing the block of the month then. Glad to have it now.
ReplyDelete